roof repair

How to Do a Roof Repair

A roof in poor condition can significantly reduce the value of a home. Fortunately, it is often possible to avoid replacement and save money by hiring Roof Repair NJ.

Surface repairs, such as replacing missing shingles, are inexpensive and easy to perform. Minor leaks and cracks around gutters, vent boots, and skylights can also be repaired easily.

roof repair

There are many things that can damage a roof. And even if you can’t fix all of them (like a tornado or whirlwind), a well-maintained roof will keep the vast majority of the damage away from your home.

Obviously, before you can do any work on the roof itself, you need to know what you’re dealing with. There’s a reason every repairman, electrician, plumber and accountant will tell you that before you can solve a problem, you have to know what the problem is.

That means taking a look at your roof from the outside. Look for missing, loose or curled shingles; stains; moss; rust and other signs of aging. Also pay attention to the ground below your roof to see if there are piles of shingle aggregate or any other indication that the shingles have been removed.

If you can, climb up on a ladder and get an up close look at the condition of your roof. Look for sagging or damaged areas, and also watch for rust or water stains in the gutters below your roof.

Also check the flashings around chimneys, dormers and vent pipes. These are the places where leaks can most commonly occur and lead to rotted framing and sheathing and destroyed insulation inside your home.

Of course, the best time to do an inspection is just after a heavy rain when water infiltration is most apparent. You should also check the attic and ceilings for signs of leakage – damp stains, mold and rot are red flags. If the leaks aren’t dealt with quickly, they can become much worse over a short period of time, damaging drywall and causing expensive water damage to your belongings.

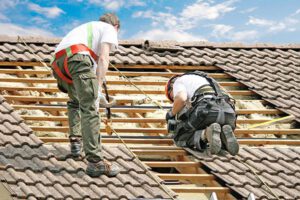
When you’re doing a roof repair, the last thing you want is to fall off the ladder and hurt yourself. It’s best to get up there only when the weather is good, not during howling gales, torrential rain or a blizzard.

While you’re on the roof, wear protective clothing and rubber soled shoes. Be especially careful when going over a chimney or dormer because these are where a lot of water will concentrate. Also look for leaks in the flashings (metal materials that redirect water) around these structures, and any spots that have deteriorated or rotted, as this could lead to the interior structure of your home being damaged.

The inside of your attic should be inspected as well. You’ll be looking for stains in the ceiling and wood damage, including rotting, mold and dampness. You’ll also be looking for telltale drip marks, or “flow marks,” on the rafters and wood framing. These will show where the water is escaping from your roof and causing interior damage.

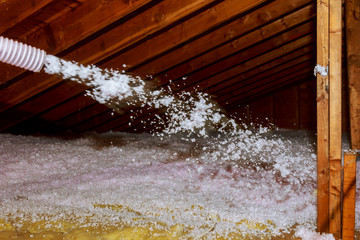
You may also want to check the insulation in your attic to ensure that it is not contaminated with moisture, which would decrease its efficiency. It’s a good idea to walk around the attic, as well, as this will let you see how your roof is ventilated and help you spot any areas that need work.

Assuming you have a sturdy ladder and are ready to begin, start at the edge of your roof and strip it of its shingles. Work slowly and carefully to prevent shingles from falling off the roof at once. You can use a notched roofing tear-off shovel, but a garden fork is often preferred as it is more efficient and less likely to get caught on nails. Be sure to remove any flashing in the valleys of the roof and over any plumbing vents only after you have removed all the shingles around them.

Starting at the edge of your roof, remove the shingles, assuming you have a sturdy ladder and are prepared to get started. To avoid having all of the shingles fall off the roof at once, proceed cautiously and slowly. Though a garden fork is often preferred because it is more effective and less likely to catch on nails, you can use a notched roofing tear-off shovel. Make sure you take off any flashing over plumbing vents and in the valleys of the roof only after you have taken off all the shingles surrounding them.

Once you have stripped the shingles from the area around the damaged spot, look at the rest of the roof to see how much work is needed. Missing shingles allow moisture to penetrate the roof and cause structural damage in your home. In addition, standing debris provides a safe harbor for animals such as squirrels and raccoons to enter your attic and cause further damage to the shingles and other elements of your home.

If the damaged shingle is simply cracked or torn, you may not need to replace it. Instead, reseal the crack or tear with a bead of roofing sealant.

If you need to replace the shingle, first, slide your flat pry bar under the front edge of the target shingle to break the sealant bond. This is best done in cool weather because the shingle sealant will be more easily sheared off with the pry bar edge when it is cooler. Once the shingle is loose, you can lift it and its nail at the same time and then remove them with a hammer. You can now move on to the next shingle.

Anyone who has ever seen roof repair work being done will agree that it is a messy business. There is a lot of debris to clean up, and the contractor will need to keep supplies and tools organized. This will help reduce the risk of damage to your belongings in the attic or to the ceilings below.

If you have children, consider having them stay at Grandma’s or a friend’s house while the roof is being repaired. This will prevent them from getting frustrated or getting hurt by stray nails or other materials during the repair process. It will also be better for the pets, who might not like all of the hammering and other noise.

It’s a good idea to remove any large tree limbs that might have fallen on the roof. These should be removed safely with a broom or other tool that will not scratch or gouge the shingles. Then you will need to cover the area with a tarp that is big enough to extend out over the problem areas and up to the peak. The tarp should be secured to the flashing or shingles with roofing nails to prevent water from seeping through or under it.

Leaks around a vent pipe or other mechanical pipe are often caused by base flashing that has been damaged or deteriorated over time. This is the piece that seals the gap where the pipe enters the roof, and it is a common cause of leaks into homes. A thorough assessment of the entire assembly including the rain cap, storm collar, and pipe itself can reveal what needs to be fixed or replaced. If this part is a primary source of leaks into the home, a more comprehensive repair is needed, which will increase the cost of the repair.

Base flashing that has deteriorated or been damaged over time is frequently the cause of leaks surrounding vent pipes or other mechanical pipes. This component, which closes the opening where the pipe enters the roof, is frequently the source of leaks into houses. Performing a comprehensive evaluation of the complete assembly, encompassing the rain cap, storm collar, and pipe itself, can disclose any necessary repairs or replacements. Should this component be the main cause of leaks into the house, a more involved repair will be required, raising the repair’s cost.

blow in insulation

How To Perform Blown-In Insulation And Dust Removal

When pests make their way into attics and crawl spaces, they can leave behind unhealthy odors and contaminants. The best way to avoid these risks is by removing the old insulation, cleaning and sanitizing the space, and installing modern blown-in insulation.

Start by setting up the insulation vacuum or blower, ensuring that it is properly secured and positioned according to the manufacturer’s instructions. Position disposal bags nearby, as well. Click here at https://perthinsulationremover.com.au/ for more details.

blow in insulationProtective Gear

Before beginning the insulation removal process it is important to wear proper protective gear, this includes safety goggles or glasses, a dust mask or respirator, long-sleeved work clothes, and sturdy boots. One company coverall is a lightweight, breathable garment that protects from dry particulates and light liquid splash. Its particle filtration efficiency test results in >98%, making it ideal for this type of work. Additionally, it is important to take regular breaks and hydrate, especially when working in a hot or confined space. It is also crucial to bag up used gloves, masks, and coveralls and dispose of them properly. This ensures that the dust and old insulation does not spread throughout your home.

Blown-in insulation is often installed in attics and cavity walls to help increase a home’s energy efficiency. It can also help with noise reduction and can aid in rodent control.

Removing Obstacles & Obstructions

It’s important to remove any obstacles in the attic space that could get in the way or impede your movements during insulation removal. This includes removing any stored items, clutter, or furniture that may be susceptible to dust or debris. You also need to be mindful of any exposed wiring or other electrical hazards that may be present in the attic. This will allow you to maneuver more efficiently and ensure a successful removal process.

Preparing The Workspace

Insulation removal is a messy and sometimes dangerous task. To ensure your safety and the success of the project, it’s important to carefully prepare your workspace before beginning the process. This will help minimize the amount of dust and debris that is created, as well as make it easier to complete the job promptly.

The first step in preparing the workspace is to assess the condition of your attic and insulation. Look for any signs of water damage, mold, pest infestation, and other issues that may compromise the performance or safety of the insulation. It’s also a good idea to check the condition of any electrical wires or plumbing pipes that may be in the attic space.

Once you have a clear understanding of the state of your insulation and attic space, remove any obstacles that might interfere with the removal process. This can be done by opening a window and directing any airflow out of the attic, as well as closing off any vents or air ducts that might be located in the attic. This will prevent any blown insulation from spreading into other parts of the home and making its way into your air ducts and through the ventilation system.

Next, a broom and dustpan should be positioned in the attic to sweep up any loose insulation and debris that is produced during the removal process. Be sure to pay special attention to corners and crevices to ensure that all insulation particles have been removed. Once this is complete, it’s time to set up an insulation vacuum or blower. Ensure that the equipment is properly positioned and securely connected to an extension cord or power source before beginning the removal process.

Finally, position a supply of heavy-duty plastic bags or containers near the extraction point to collect the blown insulation and keep it contained. Using zip ties or twist ties to tightly seal the bags will help minimize the release of any dust or fibers into the air and surrounding areas.

Once you’ve collected all of the blown insulation, be sure to dispose of it properly according to your local regulations. Also, be sure to properly store any equipment you’ve used during the process, such as an insulation vacuum or blower.

Collecting And Disposing Of The Insulation

Once you have removed the insulation, you will need to properly dispose of it. This is important because it will ensure that any harmful materials in the insulation are not released into the environment and cause damage.

You should take the time to figure out how you are going to dispose of your insulation before you start the process. There are a variety of ways to dispose of your insulation, including recycling and donation. This is a great way to reduce waste and conserve resources. If you are unsure how to dispose of your insulation, you can consult a professional to learn more about the best way to dispose of it.

When you are ready to dispose of your insulation, you will need to collect it into durable bags for safe transport and disposal. Contractor bags are ideal for this purpose, as they are substantial and long-lasting. Additionally, these bags can help to prevent the contents of the insulation from seeping out during transit and disposal. To ensure that your insulation is contained and protected, it is best to double-bag the material.

You will also need to vacuum or sweep up any dust that has been collected throughout the cleaning and collection process. Then, put any remaining dust and debris into one of the contractor bags for safe disposal. This will help to prevent any additional dust from spreading in your home.

Once the insulation is in the contractor bags, you can call your local waste management company and schedule a pickup. This is the most responsible way to dispose of your insulation, as it will ensure that the material does not end up in landfills where it could release harmful chemicals into the environment.

In addition to disposing of the insulation, you should also ensure that your home is free from any other unwanted materials, such as asbestos. This is because these materials may pose a health hazard if they are inhaled or come into contact with your skin. It is always a good idea to hire professionals for these types of projects.

Performing blown-in insulation and dust removal is an essential part of maintaining a property’s energy efficiency and indoor air quality. Whether you are a homeowner looking to improve your home’s insulation or a property manager seeking to enhance the comfort and safety of your building, understanding the process of blown-in insulation and dust removal is crucial. In this article, we will discuss the steps involved in performing blown-in insulation and dust removal and the benefits of these maintenance tasks.

Blown-in insulation is a popular method for adding insulation to existing walls, attics, and other hard-to-reach areas. This type of insulation is made of loose, lightweight materials such as fiberglass, cellulose, or mineral wool. It is an effective way to improve a property’s energy efficiency, reduce heating and cooling costs, and create a more comfortable indoor environment.

The first step in performing blown-in insulation is to assess the areas that need insulation. This could include the attic, walls, or any other areas where insulation is lacking or insufficient. Once the areas have been identified, the next step is to prepare the space for insulation. This may involve removing any existing insulation, sealing any gaps or cracks, and ensuring that the space is clean and free of debris.

The actual process of blown-in insulation involves using a special blowing machine to distribute the insulation material into the designated areas. The insulation is blown in at a high velocity, allowing it to fill in gaps, crevices, and other hard-to-reach spaces. This method ensures that the insulation is evenly distributed and provides maximum coverage.

After the blown-in insulation has been installed, it is important to perform a thorough dust removal process. Dust removal is essential for maintaining good indoor air quality and preventing respiratory issues. The blowing process can stir up dust and other particles, so it is crucial to clean and remove any debris that may have been disturbed during the insulation installation.

The dust removal process may involve using a combination of vacuuming, dusting, and air purifying methods to ensure that the indoor environment is clean and free of contaminants. This is especially important for individuals with allergies, asthma, or other respiratory conditions, as dust and airborne particles can exacerbate these health issues.

Performing blown-in insulation and dust removal offers several benefits for property owners and occupants. Firstly, blown-in insulation helps to improve a property’s energy efficiency, reducing heating and cooling costs and creating a more comfortable indoor environment. Proper insulation also helps to regulate indoor temperatures, reducing the strain on HVAC systems and extending their lifespan.

Additionally, performing dust removal after insulation installation helps to maintain good indoor air quality, reducing the risk of respiratory issues and allergies. Clean, well-insulated spaces also contribute to a healthier and more comfortable living environment for occupants, making it a worthwhile investment for property owners and managers.

In conclusion, performing blown-in insulation and dust removal is an essential part of property maintenance. By understanding the process of blown-in insulation and the importance of dust removal, property owners and managers can ensure that their properties are energy-efficient, comfortable, and safe for occupants. Whether you are looking to improve your home’s insulation or enhance the indoor air quality of a commercial building, performing blown-in insulation and dust removal is a valuable investment in the long-term health and efficiency of the property.

Tips for a Successful Tile Renovation

Bathroom Remodeling Milwaukee can transform any room into a beautiful and relaxing space. It comes in various materials, so homeowners can choose the look and feel they want.

Many tile materials come in a variety of shapes. For example, some tiles can be cut on a diagonal, creating a more modern or unique look.

One of the most important aspects of a tile renovation project is thoroughly cleaning all surfaces, particularly floors and grout. If not done properly, residues left behind from construction dust and grout haze can dull or damage the tiles. Cleaning tiles after renovation also helps ensure a long lifespan and prolongs the beauty of the new surface.

Using a vacuum cleaner with a brush attachment is advisable to clean the floor before it is mopped. Vacuuming the floor can help remove loose dirt, debris, and residual adhesives or cement. Then, a mop can be used with hot water and a mild cleanser to clean the tiles and grout. Always follow the manufacturer’s recommendations for cleaning products to avoid damaging or staining the tiles and grout.

After the floors have been cleaned, a final cleanup is needed on the walls. Construction dust, primer stains, and other residues can mar the walls of a room. If these are not properly removed, they can impede proper wall installation and lead to permanent damage.

If there are any primer stains, you can use a solvent like acetone to remove them. However, testing this in an inconspicuous area first is important to ensure it doesn’t damage the tile.

Tile is a versatile and durable material used on walls, floors, or ceilings. It comes in many different styles to suit any home decor. Choosing the right style for your bathroom is an important step in a successful tile renovation project. Consider your design preferences and your home’s unique style to help you choose the best tile for the project.

Before removing the old tile, ensuring your subfloor is ready for the new flooring is important. This will ensure the new floor has a solid foundation that can support the weight of your tiles. If you skip this step, you may damage the subfloor or experience problems with the new tile installation.

It’s also important to prepare the subfloor for tile by looking for and addressing any problems like low spots, water damage, or rot. This can help you avoid future issues with the new floor installation and save money on costly repairs.

You’ll also want to clear the space of any free-standing objects and remove any baseboard trim. Wearing a dust mask during this process is a good idea, as broken tile shards can be dangerous. Consider sealing off your vents to prevent the air from becoming clogged with debris.

Lastly, you’ll want to sweep and vacuum the area. This will eliminate any small pieces of tile and adhesive that might have fallen off during removal. Using a citrus-based adhesive remover that can also be purchased at most home improvement stores is a good idea.

The best way to remove the tile is by starting at the edge of the room, where you can access the underlayment plywood. Once you have a good grip, hammer the flat end of your pry bar underneath one of the larger tile pieces and break it loose. Then, you can chisel the rest of the tile and any remaining adhesive. Be careful to do this sparingly; you want to avoid chiseling through your underlayment or subfloor.

New tiles can add a fresh look to any room, whether on the floor or wall. But when it comes to renovating a bathroom, there are a lot of decisions that have to be made. It’s important to consider the materials and color options and how they will be installed. The final result should be beautiful and functional.

One of the first steps is deciding how the tile will be cut and where it will be placed. Photographing the space and determining how much tile is needed is also helpful. This will help avoid that sinking feeling when you run out of tile halfway through the project.

If you use a tile cutter, scoring the tiles before cutting them is best. This helps ensure a clean cut and can prevent the edges from becoming chipped or rough. This can be done by aligning the square (a ruler shaped like a right angle) with one edge of the tile and using a pencil to draw the guideline. This method is best for bigger jobs that require a lot of cuts.

Before beginning the actual work of installing the tiles, it’s important to make sure that all of the power is turned off and any electrical outlets are covered. Place outlet extenders in the wall outlet boxes is also a good idea. This will allow you to continue working later without worrying about accidentally touching live wires.

When tiling a floor, ordering 10% more tiles than you will need is generally recommended. This will allow you to have extra for broken tiles or miscuts or cut for awkward angles. Having a little extra can also be beneficial if your space needs to be bigger for the full-size tile you want to use.

A tile renovation project is a significant home improvement that requires the right materials. The correct adhesive helps the tiles stay securely bonded to the walls or floor. Choosing the wrong type of tile adhesive can lead to loose tiles that require replacement or damage that needs repair.

Before you begin applying tile adhesive, you must prepare the surface. Ensure that it is free of dust, debris, and loose paint. Clean the wall and remove any fixtures that may get in the way of your tiling project. If needed, sand or scrape the wall to create a flat surface.

There are two prominent types of tile adhesive: pre-mixed and thinset mortars. The one you choose will depend on whether the area will be subject to moisture, movement, or heat.

If you’re using a pre-mixed adhesive, it’s recommended that you use a primer before you apply the tile. This prevents the surface from absorbing the water in the tile adhesive, which can reduce its bonding strength and longevity.

Once you’ve mixed the tile adhesive, it should be spread with a trowel. It’s important to spread evenly across the entire surface before laying tiles. Comb the adhesive with the trowel’s notched edge to do this. This makes ridges that allow for more grip between the tiles and the wall.

It’s also a good idea to work quickly when spreading the adhesive. It sets quickly, so work in small sections to avoid wasting the mixture. Once you’ve applied the adhesive, please wait for it to dry before laying your tiles. To speed up the drying process, you can use a fan or a hairdryer to blow air over the area.

Before you can start laying the tiles, you need to prepare your supplies. Make sure you have plenty of tiles (in the style that best suits your design preferences) and thin-set adhesive. Thin-set is a mortar-based glue typically made from cement, fine sand, and water-retaining additives such as cellulose. Home centers and specialty tile shops usually stock most standard styles, but you may need to place special orders for more exotic tile designs. Estimate the amount of tiles you need based on the square footage of the wall surface, then pad that figure by at least 10 percent to allow for waste and breakage.

When installing the tiles, take the time to carefully check your work to ensure there are no loose or uneven spots. If necessary, strip the previous tile to remove any areas of concern. It would be best to consider re-stripping the walls to clean off any residual moisture and mildew that may have developed.

Plastic spacers keep the joints uniformly spaced as you lay your new tile. The spacers should be placed between each row of tiles and offset by one-half the tile width to maintain a running bond pattern.

Some tiles have directional arrows on their back. When laying these tiles, always keep the directional arrows facing in the same direction to help you maintain consistent pattern alignment.

When you’re finished laying the tiles, leave an expansion gap as the tile manufacturer recommends. This will help prevent cracking once the grout is applied.

bathroom trailer

Why Rent a Bathroom Trailer?

If you’ve ever been to a wedding or other event without bathrooms, you know what a pain it can be. Instead of using gross porta-potties, you can use a restroom trailer that’s equipped with real toilets and everything else that people would expect in a bathroom.

ADA Restroom Trailers offers various benefits that can improve your event or construction project for everyone involved.

bathroom trailer

Unlike standard portable toilets, bathroom trailers are comfortable enough for people to spend a long time in. They provide flushable toilets, running water for handwashing, stylish interiors, climate control systems, and more. They can be used as permanent restrooms on commercial construction projects or at outdoor weddings.

Most people would agree that a portable toilet is pretty uncomfortable, especially when it’s used for extended periods of time. However, bathroom trailers are much more spacious and have multiple amenities that make them a great option for guests who need to use the restroom while at an event.

For example, most of these trailers feature clear and bright lights to make them easy to navigate even in the dark. They also have laminated floors and sinks, which are far more comfortable than the plastic surfaces you find in standard portable toilets. They’re also equipped with mirrors, so guests can check their appearance before they go back outside. Additionally, most trailers have a roll of paper towels for washing hands.

In addition to being more comfortable than portable toilets, bathroom trailers are also easier to maintain and clean than traditional restrooms. Because they’re so spacious and have many extra features, it takes less time to clean and sanitize them, which is important for maintaining a sanitary environment. Additionally, they’re often larger and have more waste storage tanks, so they can hold more waste than a traditional portable toilet can.

Another way that restroom trailers are more comfortable is that they’re usually climate-controlled, so guests don’t have to deal with the unpleasant heat or cold that can make some portable toilets feel like big plastic ovens as soon as you step inside. This is particularly important for construction workers who need to use the restroom throughout the day, and they can help ensure that people aren’t tempted to leave the site early because of discomfort. 

Compared to traditional portable toilets, bathroom trailers are much more versatile. They can be moved around your event site to provide guests with convenient access to bathrooms at their leisure, enhancing the overall guest experience. These mobile restrooms are also more spacious than their porta-potty counterparts, making them an ideal choice for events with children. The larger interior space can accommodate parents and their small children more comfortably, so they’re able to stay together while using the restroom.

In addition, restroom trailers can be outfitted with various amenities that can further enhance the guest experience. This includes ambient lighting, contemporary fixtures, artificial hardwood floors, stainless steel sinks, climate control systems and more. These features can help you tailor your bathroom trailer to an upscale event or work environment and ensure that guests feel comfortable and at home during their visit.

Aside from their luxurious features, restroom trailers are a more sustainable option than portable toilets. While traditional portable toilets require a significant amount of water with every flush, restroom trailers are designed to use significantly less, conserving both water and energy. They also store waste in a sealed tank, which is then collected and hauled away by the rental company after your event has concluded. This keeps harmful waste from seeping into the ground and contaminating surrounding water sources.

If you’re planning an outdoor wedding, a restroom trailer is a great way to set your big day apart from the rest. In fact, these deluxe restrooms are perfect for any occasion that takes place outside, including corporate events and fundraisers.

As long as you have a suitable flat area where your restroom trailer can be placed, it’s easy to rent one and transform your venue. These mobile restrooms are equipped with all the necessities, so you don’t need to worry about providing guests with basic amenities like toilet paper or sanitary products.

Plus, these luxury restrooms come with an attendant. Each one arrives accompanied by an immaculately dressed attendant who will keep the unit stocked and clean for the duration of your rental period. This service can make all the difference in creating a memorable, high-end event.

If you are looking for a greener option when it comes to restrooms, a bathroom trailer is the way to go. These units minimize water usage, use eco-conscious materials and utilize innovative flushing systems to provide a hygienic, environmentally responsible alternative to standard portable toilets.

Another great thing about portable restroom trailers is that they can be moved from one location to the next without any plumbing or connections required. Whether you need a single unit for a small event or several of them to serve your large construction worksite, they are easily portable and designed to accommodate any space.

Unlike a stand-alone porta potty, bathroom trailers have multiple stalls and plenty of room to move around, making them a comfortable and sanitary option for guests. Plus, many trailers are equipped with mirrors and fully functioning sinks so that people can wash their hands and clean up when they visit the restroom.

These units are also able to be customized with ambient lighting, contemporary fixtures, artificial hardwood floors, and other amenities that allow them to fit into any setting. This allows you to create a look that matches your theme and ensures that the restrooms are a seamless addition to your event.

Finally, a restroom trailer can be connected to a portable waste tank for easy disposal of all of the waste generated by your guests. This reduces the amount of garbage you need to dispose of after an event and helps to make sure that your venue stays as sanitary as possible throughout the duration of your event.

Restroom trailers are also a much more sustainable option than other types of portable restrooms because they are self-contained and require no outside water or power supply to operate. This makes them a perfect choice for remote locations where access to plumbing and other utilities may be difficult. Plus, they can be parked in a variety of locations, including on a paved driveway, or even right next to your marquee at a wedding!

If you’re looking for a more affordable option than a traditional portable restroom, consider renting a bathroom trailer. They offer more comfort and functionality than standard portable toilets, and can save you money in the long run by reducing your utility costs. Plus, they’re easier to clean and maintain than other types of portable restrooms.

When you rent a portable restroom trailer, you’ll be able to control the cost of your rental by selecting the size and amenities that are right for your event. For example, a single portable restroom can be rented for one to two day weekends and will only require a water supply and electricity hookup. This option works well for events like weddings or concerts where lines can get long and you need to keep people moving. If you’re planning a larger event that requires more than three portable restrooms, you may need to add a sink and air conditioning to make your guests more comfortable.

Luxury restroom trailers can also be rented for longer periods of time, such as construction projects and disaster relief efforts. They’re equipped with flushable toilets, sinks, and mirrors to help your guests feel pampered. They’re also a great way to provide a sense of home-like comfort for your guests at outdoor events like music concerts or charity fundraisers.

Most restroom trailers are more spacious than a typical portable toilet and have multiple stalls to ensure privacy. They also feature amenities that aren’t always available in portable bathrooms, such as showers and climate control features. This makes them a more convenient option for guests with disabilities, and they can be customized to match your event’s theme or branding.

Unlike standard portable restrooms, many bathroom rental trailers have mirrors so guests can check their appearance before heading back outside. Some even have sinks to wash their hands before leaving, making them more comfortable than the cramped and dark environment of a standard portable restroom.

Once your rental period is up, the restroom company will come and pick it up. They will then empty the waste storage tank and sewage system and transport it to a wastewater treatment plant, where they’ll process the water into clean water. This helps to reduce your event’s carbon footprint by avoiding landfill disposal and minimizing the need for additional portable toilets on-site.

Planning a Bathroom Remodel

Bathroom remodeling in Home Remodel Contractors Tacoma adds value to your home, especially if you are considering selling it. Replacing old hardware like tubs and toilets with low-flow fixtures can save water, and adding shelving and cabinets can increase storage capacity.
Remodeling refers to various changes that affect the layout, design, or overall appearance of a room. This is different from renovating, which usually involves structural changes, such as reworking the size of a room.


One of the first things you’ll need to consider when planning a bathroom remodel is the layout. Depending on how often you use your bathroom and what for, you’ll want to plan out where you put everything from the sink, bathtub, and toilet so that they’re easy to access when it comes time to brush your teeth or take a shower.
The curved basins, which have mirror cabinets on their sides, are opposite each other, as well as the shower enclosure and toilet, while a tub sits directly next to the door.
This unique layout is the perfect example of how creative space planning can elevate the design and function of a bathroom. The use of rectangular areas with rounded corners in this modern layout creates an interesting balance while making the room look stylish and neat.
A remodel is a more involved project than a renovation because it involves changing the design, layout, and appearance of the bathroom. This includes cosmetic changes such as painting the walls, adding new flooring, or installing a new vanity and cabinet. It can also involve removing walls, moving plumbing hookups, or changing the location of fixtures. Typically, a remodel requires the help of a professional and will cost more than simply renovating.
Once the basic structure of the room is finished (walls, showers/tubs & cabinets), it is time to move on to the details. Adding lighting can help to set the mood & function of this space. There are several ways to light up your bathroom & the choices are endless.
To create an ambient, even glow in the room, consider using wall sconces or flush mount lights that provide lots of light without overpowering the room. For task lighting, recessed or track lights are an option that can be focused exactly where needed. A dimmer is an easy way to add flexibility and control. Bath bar lights are another great way to add a lot of light with a more contemporary look & feel.
Lighting color temperature is also an important consideration. A warmer tone will reduce shadows & make skin tones appear more flattering, while a cooler shade allows colors to be seen with better clarity and less of a bluish tint.
When choosing a contractor to handle your remodel, be sure they are a licensed professional. Some require contractors to be licensed and insured before they begin work on your home. If you live in a neighborhood with a homeowner/condo association, you may need approval before starting the remodel.
Before remodeling begins, it is a good idea to remove or cover any items in the vicinity of the area that will be worked on. This will prevent damage to furnishings, electronics, or other items that may get covered in dust & dirt during the renovation process. This will allow you to clean windows and vacuum the area before construction starts.
A bathroom is a high-traffic space that can quickly become cluttered. Fortunately, the remodeling process offers plenty of opportunities to add storage solutions that help keep things tidy and organized.
Whether you’re looking for a quick fix or a complete overhaul, these savvy bathroom storage ideas are sure to give your space a boost. The smallest improvements can make a big difference, from adding extra shelves to your cabinetry to installing a built-in shelving unit like what Larson said in this small powder room.
Pretty clear storage bins are essential for keeping everything from toiletries to hair products and accessories organized, especially when adorned with printable labels for easy-to-read labeling. If your bathroom has a lot of open shelving, try introducing some decorative baskets to the mix for additional visual interest and a touch of softness.
Over-the-cabinet baskets can be a game changer for storing things like blow dryers, curling irons, and straighteners that easily get lost in the back of a drawer or a deep cabinet. They’re a great way to keep all your tools in one place while making them easy to grab when it’s time to style.
When not in use, the top two trays can store face wash, cotton balls, and other essentials. You can even spruce up your cart with an easy-to-care-for plant for an instant dose of tranquility.
While you are remodeling your bathroom, you will be installing new fixtures, including sinks, showers and tubs, toilets, cabinets, and mirrors. These fixtures can dramatically impact the overall style of your bathroom. They should match the style of your home and be easy to clean.
It would be best if you always visited a plumbing showroom to get ideas and help make selections. It is also helpful to revisit your priority list of fixture features as you look at different options, especially for items that may be difficult to change after the remodel, like your faucet. For example, do you want separate hot and cold water knobs, or would you prefer one-hand control?
A bathroom is a room where the use of color is very important. You will want your new fixtures to coordinate with the paint and tile you plan to use for your bathroom. If you plan on repainting the bathroom after your renovation, make sure that you are selecting colors that will coordinate with your new fixtures and that you know how much your project will cost to install a paint job.
If you plan on a DIY remodel, it is best to keep in mind the difficulty level of your renovation and have additional tools on hand for unexpected situations. For example, a wet-dry shop vac will be useful for cleaning up water or dust that may fall during the remodeling process. Also, it is always good to mark where the electrical wiring and plumbing pipes are located so you don’t accidentally damage them.
When choosing new bathroom fixtures, it is best to stick with neutral options to resell your house easily. Bathroom-style fads can be short-lived, and a dated bathroom can detract from your resale value.
When remodeling a bathroom, there are many things to take into consideration. Some factors are more important than others and can have a huge impact on how the finished project will look and function. Whether you are tackling a complete overhaul or simply changing at least one aspect of the space, it’s important to plan and make sure that your design choices align with your goals and fit within your budget.
A remodel focuses on changes that affect the layout, design, and appearance of a room without altering its size or structure. This can include anything from shifting the location of a tub or toilet to installing a new vanity cabinet or countertop. It could also involve adding or replacing flooring or refinishing the existing tile.
Renovating your bathroom can give it a completely new look while still maintaining the overall functionality of the space. For example, upgrading your light fixtures to energy-efficient models can help lower your utility bills. Likewise, replacing old toilets with WaterSense-certified models will reduce your home’s water usage.
A renovation can also preserve and enhance the classic features of your bathroom, such as a vintage clawfoot bathtub or beaded-board wainscoting. For instance, painting these classic features a fresh color can revive their original beauty while making them more functional. A renovation is also the perfect time to consider upgrading your vanity, mirror, and sink. Choosing the right materials and finishes will ensure your new bathroom is consistent with your home’s style. This will help to create a seamless transition between rooms. It’s a good idea to create a floor plan before starting any work to determine how your new bathroom will fit in the existing space.

Replacement Windows

How Replacement Windows Can Transform Your Home

New windows can improve your home’s overall environment with features like UV protection for walls, fabrics, and furniture. They also offer improved security and energy efficiency.Replacement Windows

Replacement windows are designed to fit into existing window openings and typically don’t require the need for alterations in trim work, drywall, or siding. This allows for faster installation and a less disruptive project. Visit Website to learn more.

When old windows are replaced with new ones with the ENERGY STAR label, you can expect to see savings on your energy costs. This is because these windows are better insulated and help keep heat in during cold winters and hot summers, thereby reducing your utility bills. Plus, many utility companies have rebates and other incentives for homeowners looking to save money on their energy costs.

Another benefit of energy-efficient replacement windows is that they also help reduce condensation in your home. This is because older windows tend to trap moisture inside, which can lead to mildew and other issues. However, when replacement windows are installed with a tight seal and quality insulation, this moisture is less likely to form which can help prevent mildew and other problems.

A final advantage of replacement windows is that they often require little to no maintenance. This is because they’re designed to last for decades and they offer a lot of durability when compared to other window options. This is great news for homeowners who are trying to avoid constant upkeep or who simply don’t have the time to maintain their existing windows.

Finally, energy efficiency is also a huge selling point when it comes to your home’s value. This is because it can add to the overall comfort of your living space, and it can make your home more appealing to potential buyers if you plan on selling it in the future.

When choosing replacement windows for your home, there are several different options available to you. For example, you may want to consider double-hung windows which can be easily tilted inward for cleaning or sliding windows that provide more viewing area without requiring you to use ladders or stools. You can also find casement windows, bay and bow windows, and awning windows which are all great choices depending on your needs. The main thing to remember is that you should choose the type of window that best matches the style and design of your home.

Increased Curb Appeal

The right windows can transform the look of a home. They can create a sleek, contemporary style or a rustic, classic appearance. New windows are available in a wide range of colors and finishes that can match or complement existing trim or siding. Many manufacturers offer specialty shapes and finishes for even more design options.

Window replacement is an easy way to improve your home’s curb appeal. Old windows often have rotten frames and sills, which can detract from the look of your home. New windows, on the other hand, are more attractive and can increase the value of your home.

While it may not be at the top of your to-do list, window replacement can improve your home’s appearance and make it more appealing to potential buyers if you ever decide to sell. In addition, new windows can help to save energy costs and reduce outside noise.

If you’re planning to replace your windows, consider scheduling the work during the fall. This is a slower time for window companies, and they are more likely to be able to fit your project into their schedules.

Another benefit of window replacement is that it can be done a little bit at a time. For example, if you have a difficult-to-open double hung window over your sink, you can replace it with an easy-to-open awning window. This will make it easier to clean your kitchen windows and allow for more light into the room.

You should also consider upgrading your windows to double or triple pane windows for improved energy efficiency. The added glass layers will help to keep your home warmer in the winter and cooler in the summer, which will cut down on your energy bills. They will also reduce outside noise, which can be a big plus for homeowners who live in an urban area. If you’re ready to upgrade your windows, contact a professional window contractor for more information on the best options for your home. They can help you choose the best frame type and color to suit your style, as well as provide expert installation services.

Increased Home Value

Savvy home buyers will consider your upgraded windows as a selling point. A home appraiser may also take your replacement windows into consideration when conducting a home valuation.

Window replacement has a high return on investment (ROI), especially when you install energy-efficient windows. According to a 2021 survey, 83% of homeowners consider ENERGY STAR-certified windows an important factor when purchasing a new home. Your utility bills will be lower, too, allowing you to recover the costs of installation within a short period of time.

You can choose from many types of windows when you upgrade your Philadelphia home. There are endless options in terms of shapes, sizes, colors and hardware finishes. The ability to customize your windows gives you the freedom to match the aesthetics of the rest of your house and create a consistent, beautiful look. The right window can also expand your view and let more natural light into your living space.

Another benefit of upgrading your windows is their increased security. New replacement windows with multiple locking points can help you secure your home, making it more attractive to potential homebuyers. This type of security feature may also save you money on your insurance rates.

When your windows are aging, you may start to notice signs of wear and tear, including peeling paint, warped framing and cracked glass. You may also be having trouble opening or closing your windows or experiencing condensation build-up on the interior.

While it is possible to perform minor repairs to your windows, it is better to replace them when the damage becomes extensive or if they are becoming outdated. Replacing your windows with modern versions can give your Philadelphia home a fresher appearance and increase its market value.

The most effective way to add value to your Philadelphia property is by improving its energy efficiency. New replacement windows will stop air from escaping the home and prevent outside air from entering, thereby reducing your energy bills. You may even be eligible for a rebate or credit from your local energy provider or the Database of State Incentives for Renewables and Efficiency to reduce your initial costs.

Reduced Noise

A quiet atmosphere is key to a good night’s sleep. That’s why noise-reducing windows are a great option for those living near airports, interstates, racetracks, concert venues, or even just busy streets. Noise-reducing windows are insulated and effectively block out unwanted sound from entering your home. This is because double-pane and triple-pane replacement windows have thicker glass and tighter seals than traditional single-pane windows. These features not only help reduce energy consumption, but also lower outside noise levels.

The type of material your replacement windows are made from and the size of the window will also play a role in their effectiveness. For example, wood and fiberglass are heavier materials that are more effective at reducing noise than aluminum. Additionally, larger windows will provide a greater reduction in noise than smaller windows.

When selecting a noise-reducing window, make sure to consider the window’s STC rating (Sound Transition Class Rating). This number measures how much sound a window blocks out. Renewal by Andersen windows have a high STC rating, significantly lowering the amount of noise that enters your home.

For optimal noise reduction, choose double-pane windows with a wide gap between the two panes and a gas fill, such as argon. This is because a vacuum has no sound-reducing properties. Another way to improve your windows’ sound-reducing capabilities is by choosing ones with offset glass thickness. This technique adds an extra layer of insulation and helps increase your window’s STC rating without adding to the cost.

cleaning service

Crime Scene Cleanup – A Grueling Job That Requires Immense Attention to Detail

Crime scene cleanup is a grueling job that requires immense attention to detail and often means working overnight. This job is the responsibility of property owners or next of kin. It involves removing blood, fluids, tissue, and hazardous materials that can cause infection or disease if not treated properly.

Crime scene cleaners are equipped mentally and physically to handle homicides, traffic deaths, decomposition/undiscovered deaths, and suicides. They are licensed waste carriers and can safely dispose of contaminated material. Click https://www.allproutah.com/ to learn more.

cleaning service

In many cases, after the police unwind their crime scene tape and homicide detectives survey the site, the next of kin is left to clean up the gruesome aftermath. This is a burden that no one wants to shoulder but is often necessary. Fortunately, some professionals specialize in this type of cleanup, called crime scene cleaners or biohazard remediation technicians. These are iron-stomached, steel-nerved people trained to deal with the unthinkable and harrowing scenes of blood, bodily fluids, and tissue matter that can be present after a death or crime.

Their work can be traumatic, but they have a job and must focus on their task while being compassionate towards grieving family members. Crime scene cleaners often wear liquid-impermeable hazmat suits with shoe covers, safety glasses, and full-face respirators for their protection and the safety of those they are working with.

They also must make sure they can decontaminate the site and return it to its pre-crime state before they can begin their work. Depending on the situation, this may include removing hazardous waste such as needles and knives left behind. Crime scene cleanup involves thoroughly assessing, clearing, disinfecting, and deodorizing the area.

The only way they can do this successfully is to have a strong stomach and separate their emotions from the job required. Despite the negative connotations, this is different from the type of job most people want to undertake, so it should only be considered if you are confident you can handle it.

Blood, bodily fluids, and fingerprint dust are just a few of the many daily hazards that crime scene cleaners face. These bio-hazardous materials can contain infectious diseases like HIV, Hepatitis C, Cholera, and Tuberculosis. Crime scene cleaning professionals have received specialized training in safely remediating areas exposed to these hazardous materials.

Because of this, it is not recommended that anyone attempt to clean a crime or trauma scene on their own. This type of cleaning requires special equipment, industrial chemicals, and the proper disposal of biological waste. It is also a highly regulated industry with strict guidelines set by the Occupational Safety and Health Administration.

Crime scene cleanup professionals use personal protective equipment (PPE) such as liquid-impermeable hazmat suits, gloves, and safety glasses to protect themselves from exposure to bloodborne pathogens and other contaminants that may be present at a scene. In addition to the PPE, they use traditional cleaning supplies such as mops, buckets, spray bottles, brushes, and scrapers. These are all discarded after the job and sent to a biohazardous waste container for safe disposal.

When working at a crime or accident scene, cleanup crews must be careful not to disrupt any ongoing investigations that could lead to further injury or death for local law enforcement officials. This is why it’s important to work with a crime scene cleanup company that coordinates with police officers and other relevant authorities to ensure that all evidence has been collected before beginning any remediation efforts.

Crime and accident scenes often contain remnants of a tragic event, including sharp objects that can cause physical harm. These hazards can pose serious threats to the safety of workers and residents, and they must be removed by professionals who are familiar with the appropriate safety precautions.

Crime scene cleanup experts must be properly outfitted with personal protective equipment (PPE). This includes gloves, gowns, shoe covers, head covers, masks, respirators and eye protection. Gloves protect hands when directly handling contaminated surfaces, gowns prevent the contamination of clothing, and a face mask provides splatter protection for the nose and mouth. For eyes, a pair of goggles protects blood and other fluids that can be splattered on the face. Booties and two sets of gloves also help keep the feet and hands-free from contaminants.

The full-body coverall that crime scene cleaning experts wear is designed to meet Occupational Safety and Health Administration (OSHA) standards and the specific requirements for decontamination, exposure control, training programs, medical waste disposal, and disinfectant selection. Typically, these coveralls include long sleeves with elastic wrists and ankles to keep the sleeves and pant legs from riding up and exposing the skin to body fluids or harsh chemicals.

Another important piece of PPE is an apron worn over the work clothing to protect against splash and spilling of harsh chemical solutions, biological materials, or bodily fluids. Additionally, to combat the heat of working in a full-body coverall, it is normal for crime scene and disease cleanup experts to wear a cooling vest.

Finally, since blood is the primary carrier of infection, it is very common for crime scene cleanup professionals to wear two pairs of gloves to ensure their hands are protected. Because of the horrendous odor of a decomposing body, it is normal for these workers to also wear a face mask and a respirator as part of their PPE.

The blood and bodily fluids left behind at a crime scene can contain bacteria, viruses, and other pathogens that could cause serious health problems in anyone who comes into contact with them. Crime scene cleaners use disinfectants to thoroughly clean and decontaminate the area and restore it to a safe, healthy environment.

Disinfectants used by crime scene cleaners include bleach and peroxide, which are effective disinfectants. They also use enzyme solutions that re-liquefy blood and other bodily fluids to remove them from surfaces. Crime scene cleaners also use chemicals to destroy stains and biohazards from fabrics, wood, paint, and other porous materials.

Unlike traditional cleaning supplies, these chemicals are designed to destroy bacterial and viral contaminants without damaging the surface on which they are applied. They are also often applied using high-pressure washers to ensure they reach deep into all cracks and crevices.

Crime scene cleanup is a highly specialized service that takes significant training and knowledge to perform properly. Forensic cleaners are trained to take extra precautions with every process step to avoid further contamination or damage to a property and its contents.

It is important to understand that it doesn’t have to be a violent crime for you to need a crime scene cleanup service. Unattended deaths, suicides, drug overdoses, and accidents require professional forensic cleaners to remediate and restore the scene. Leaving a crime scene alone can create a dangerous situation for anyone who enters the home and can impact the overall sale valuation of the property. In addition to re-creating the scene as it was before the incident, a professional crime scene cleanup team can also provide additional services such as odor removal.

After police officers, paramedics, and coroners do their jobs and remove any evidence from a crime scene, it is up to professional cleaners to disinfect and clean the location. A thorough crime scene cleanup involves removing any indicators of the incident and any blood or other bodily fluids left behind.

Because blood and other bodily fluids are potential sources of infection, crime scene cleanup workers must take the necessary precautions when handling these materials. They are required to wear protective gloves and masks and use specialized disinfectants.

As part of their crime scene cleaning process, professionals often run ozone through the area to further decontaminate and eliminate any remaining biohazards at the scene. Ozone works by changing the oxygen molecules in the air and removing bacteria and odors. Crime scene cleaners will also wipe down and sanitize all surfaces, furniture, and items in the area. They will then remove and properly dispose of all waste material.


BAM

BAM Reviews

BAMBAM is one of the most well-known cutting-edge performing arts venues. The organization focuses on presenting thought-provoking work from artists of national and international renown.

The training teaches how to set up lead-generation systems for local service businesses. This is done by referring prospective customers to the service providers who pay you for each lead. Read BAM Reviews for more information.

Bam is quite pricey compared to other outdoor brands, but it is worth the premium if you seek ethics, longevity, and versatility. The Novea base layer is especially good value for money and is an excellent choice for milder winter days or shoulder seasons.

One of the biggest challenges with the rank and rent method is obtaining new leads to service your clients. The training provides great value by laying out several strategies to help with this, including Google and Facebook ads. This can really cut the time to rent down significantly.

Another area that the training covers is the legal side of running a business. This includes everything from forming a company to how to receive payments. This is important for people unfamiliar with this aspect of business. The training also provides some very useful insight into how to deal with difficult customers. Using these methods will help you improve your customer service and increase sales. It will also help you create a more positive reputation in your industry. This will, in turn, lead to more referrals and repeat business. In the long run, you will have less stress and more money in your pocket.

Content

A funny look at pro skater Bam Margera and his bride-to-be, Missy The couple must book venues, find attire, and ease family members’ fears that the wedding will turn into a disaster or feature a death metal band. Like other Jackass-related shows, the show is not for kids.

One of the best parts of BAM is how it teaches you how to start and grow your business. This training includes many important lessons, such as how to hire employees and handle employee problems. This is something that a lot of lead generation courses do not cover, and it’s a huge benefit for anyone looking to start their own business.

Another great thing about BAM is that it is fast-growing and committed to treating its team members like family. It also provides a number of tools and software that will help you get your business off the ground. These include Snapps and Callling, both of which were developed by Dan Klein. He is the creator of the JK coaching program and the founder of BAM.

Performance

BAM is a cloud-based digital asset management (DAM) system that streamlines sales enablement by providing marketing and sales teams with easy access to current content across all channels. Whether it’s product catalogs, marketing materials, or pricing sheets, everything is instantly updated in the BAM app and accessible to users wherever they are. This eliminates marketing inefficiencies and chaos while empowering the sales team with a powerful tool to respond quickly to customer needs.

The training covers a lot of important topics in business that most people don’t think about, such as legally forming your company and how to properly receive payments. This helps you avoid common pitfalls and saves a ton of time down the road. Josh also talks about hiring and how to do it effectively and economically.

Another great thing about the training is that it teaches you how to set up lead-generation systems for your services. This includes paid ads on Google and Facebook. These can help you find initial clients and cut your lag time to rent down significantly.

As one of the oldest performing arts centers in New York, BAM is committed to supporting boundary-pushing artists and ideas. It has a history of supporting and presenting work that challenges both the audience and its creators. The company offers a range of programming in theater, dance, music, opera, film, and other artistic disciplines. It also offers thought-provoking discussions and community activities. BAM presents and produces work by performers of international renown. Its venues offer three main stages and a series of smaller spaces.

Value

BAM is dedicated to bringing its team members together as a family and goes above and beyond to make sure everyone feels supported and appreciated. It’s a fast-growing company that is committed to taking care of its employees and ensuring they have an excellent work-life balance.

One of the best things about BAM is that it provides plenty of value in the form of lessons that teach business basics, such as how to legally form a company and how to receive payments. These are essential skills to have when starting a new business, and BAM has an entire module dedicated to teaching them.

Another thing that BAM offers is a comprehensive lead generation system, which is vital for any service business. It teaches people how to find clients in their local area, and it also teaches them how to use Google Ads and Facebook Ads to generate leads. This is a great way to reduce the time it takes to get started and start earning money. It’s also an excellent way to cut the cost of running a business.

Social Ad Tribe Review

Social Ad Tribe Review

Social Ad Tribe is the new Facebook and Google Ads coaching program from Sean Kochel. The training is incredibly comprehensive and easy to follow.Social Ad Tribe Review

Instead of targeting demographics, tribe marketing focuses on your audience’s passions and interests. This helps you build more authentic relationships and brand affinity. It also allows you to create ads that are better targeted and optimized for your goals.

Social Ad Tribe is the newest Facebook advertising training program on the market. It is designed to help small businesses generate leads using Google and Facebook advertising. The program also teaches how to create compelling ad copy to attract potential customers. It also includes ad spy tools that can save time by showing what ads are working well in a given market.

A key to building a social media tribe is finding out what makes your audience tick. This can be done through research or simply by paying attention to what people are saying on social media. In addition, a brand must stay true to its message and not try to force its tribe to like it. This will lead to loyalty and respect for the brand.

Another way to engage your social media tribe is to offer a unique experience. This can be anything from a contest or giveaway to an Instagram takeover. This type of marketing can increase engagement, brand recognition, and trust. The goal is to find out what your audience wants and needs, and then give them that.

The social ad tribe app is designed to solve the problem of creating on-point, authentic branded content that resonates with social audiences. This content is often in short supply, and current creative solutions (creative agencies, in-house teams, or low-cost stock image libraries) aren’t enough to drive commercial performance and positive brand sentiment.

Tribe Digital’s app uses a combination of artificial intelligence and human review to ensure that all branded content is in compliance with each platform’s guidelines. This helps ensure that content will be approved by the relevant social media managers and avoid rejection or deletion. The app also has a user-friendly interface that makes it easy to use for all types of users.

In a world where content is king, it’s important to stay up-to-date on trends and best practices. This is especially true with social advertising, where there are constant changes in the algorithms and new features being released. The social ad tribe app is a great resource for keeping up with these changes and learning what works and what doesn’t.

The Owners

Founded in 2014, TRIBE is a global community of influencers who are passionate about creating trusted content for brands on social media. WNIP caught up with Lisa Targett, UK Manager at TRIBE, to learn more about the company and how it works.

The ad tribe concept is becoming increasingly important on social media as algorithms change the way that content is shown to people. It is no longer enough to put up a huge budget and hope that it catches on; you now have to create compelling content that speaks directly to the interests of your audience. This is why it makes sense to focus on building a strong tribe of people who are truly interested in your brand.

Social Ad Tribe is a new Facebook advertising training program that claims to teach you how to run successful lead generation campaigns for small local businesses. The program was started by Sean Kochel, a seven-figure agency owner who focuses primarily on Facebook and Google ads for his clients. The program also includes training on other social media platforms such as TikTok, Pinterest, and YouTube ads. The program is a new player on the scene, so it has a lot to prove, but it seems like a solid option for those looking to get into social media marketing. The training is top-notch, and Sean is always finding ways to add value to the program. The support is also great, and the private Facebook group is a fantastic resource for new ideas and strategies.

The Training

Whether you’re looking to boost your social media marketing, generate leads, or get more out of your current ads, the social ad tribe will help you achieve your goals. The program teaches you how to use the power of Facebook, Instagram, and TikTok to create engaging ad campaigns that convert. This includes everything from targeting and ad placement to creatives and budgets. The course is led by Sean Kochel, who has a proven track record of helping small businesses build their online presence and attract new customers.

Social Ad Tribe also offers a free training video that provides a complete overview of how the program works. The video covers the basics of Facebook and Google ads as well as how to create ad copy that grabs a potential customer’s attention. The training video is perfect for beginners who want to learn how to create and run successful social ads.

To make the most of your ads, you need to understand your audience’s needs and desires. For example, you need to know their demographics and what types of content they’re interested in. Social ad tribes can help you identify your target audience by using the platform’s built-in analytics tools. Then, you can tailor your ad creative to meet their needs.

A good way to build trust is by using content that’s authentic and created by the people you’re targeting. This content is often more effective than traditional ad copy. Moreover, it’s more cost-effective. In fact, user-generated content (UGC) has a 6.9x higher engagement rate than brand-generated content.

Lastly, a good strategy is to set clear goals for your campaign. This will help you measure the success of your ad campaigns. Moreover, it’ll help you avoid common mistakes that can hurt your performance. For instance, over-explicitating your messaging or creating an ad that’s too long can irritate users.

It’s also important to communicate regularly with your tribe. For example, you can host Instagram takeovers to give your followers an opportunity to share their own pictures and videos with your brand. Similarly, you can host Facebook Live sessions. This allows your audience to interact with you and ask questions.

The Support

Tribes are groups of like-minded people that share a common interest, purpose, or goal. They can be very powerful marketing tools for businesses and are particularly useful in the age of social media. Brands that understand this concept are able to connect with their audiences in a more meaningful way and increase their customer base and sales. Some examples of successful tribe-building campaigns include Zappos placing ads in airport security bins to reach travelers, Nintendo targeting young mothers with Wii parties, and Yelp’s Elite Squad of reviewers.

Creating and maintaining a social media presence is challenging for all businesses, especially small business owners. However, a social media manager can help you get the most out of your social media presence while freeing you up to focus on other aspects of your business. They can also help you create a content calendar and optimize your ads. A social media management tool is an excellent way to keep your team on track and save time while delivering high-quality results.

A social ad agency can provide your business with the creative and strategic support it needs to thrive in today’s competitive online landscape. The right agency can help you generate more leads, optimize your ad spend, and build an audience that is engaged and interested in your business.

When choosing a social ad agency, look for one with experience in your industry. They should have a proven track record and be able to provide you with testimonials from other clients. They should also be able to customize their services to meet your unique requirements.

Social Ad Tribe is a new Facebook and Google ad coaching program that launched in early 2021. This coaching program is primarily focused on lead generation for local small businesses through Facebook and Google ads by writing compelling ad copy. Besides Facebook and Google, the program also teaches how to run ads on Pinterest, Snapchat, and YouTube. The program was developed by Sean Kochel and Joshua T. Osborne, who are both highly respected digital marketers with their own successful online programs.

Handyman

A Must-Have Tools For a Handyman

A handyman is a professional who can perform maintenance work. Handyman Naperville IL is skilled in many areas, including electrical, plumbing, and repairing appliances. They can also complete a variety of other tasks. They often work on a contract basis and may have to travel between jobs. This is why they need to have good portable tools.

Handyman
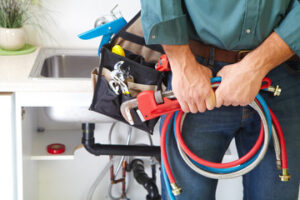
The fish tape is an essential tool for handypersons, as it can make it easier to run cables or wires through a wall. However, it can be tricky to use and requires a lot of practice. Some tips and tricks for using this tool include ensuring that you have the right length of fish tape and wrapping it properly. This will help to prevent damage from snagging or getting caught on couplings in the walls.

Many hardware and electrical stores carry various fish tapes, ranging from 50 to 200 feet in length. They also come in steel and fiberglass options, each rated for tensile strength. Most fish tapes have hooks on either end that can be attached to the wire or cable you want to pull through a wall or conduit. Then, the tape is pulled back slowly to bring it through the hole.

When choosing a fish tape, getting one with easy-to-read markings is important. This can help you determine the distance of a hole or cable that is needed, as well as making it easier to mark your work area. In addition, you should look for a non-conductive model that can be used in areas where there may be electricity present. This can help reduce the risk of shock or injury to the professional. It is also a good idea to have several different fish tapes on hand, as it can be difficult to find the right length of one for a particular project.

Electrical tape

Electrical tape is one of the most useful tools for a handyman. It helps to insulate wiring, make minor repairs to electrical cords, and color-code wired connections. It is also fireproof and resistant to heat, making it ideal for projects involving exposed wiring. A good electrical tape is designed to resist extreme temperatures, and its elastic backing allows it to tightly wrap around a wire. To test a tape’s elongation, stretch out a few inches and wrap it around your finger. If it doesn’t constrict, you should consider buying a different brand.

A good electrical tape should also be water-resistant, which is important for a variety of jobs. Look for an option that has a PVC backing and a rubber adhesive, which can provide resistance to moisture and corrosive elements. You can also find options that are UL listed and CSA certified for added protection.

Another great alternative to traditional vinyl electrical tape is liquid electrical tape, which is applied using a built-in brush and delivers abrasion and damage resistance. It is available in a wide range of colors, and some are even rated for outdoor use. When applying this type of tape, it’s important to follow the proper technique, which is called the half-lap method. This involves overlapping each layer by half the width of the previous one, and it should be thicker than the wire’s insulation.

Duct tape

Duct tape is a versatile adhesive that can be used for a wide range of applications. It has a cloth backing coated with polyethylene and a rubber based adhesive, giving it unique waterproofing properties and strength. It’s also easy to tear by hand, and comes in a variety of colors and prints. You can find duct tape with everything from whimsical yellow ducks to college logos to practical camouflage patterns.

The duct tape that we know and love today was first invented in 1942 during World War II. A factory worker named Vesta Stoudt developed the idea for a strong, water-resistant tape to seal ammunition boxes. Johnson & Johnson began producing the product and it became a military favorite. It later gained a new name and color, becoming the silvery tape we know and use today.

To ensure that duct tape works well, it’s important to use it on surfaces that are clean and dry. The adhesive on the tape won’t stick well if there are oil or dust particles present. Also, if the surface to which you are applying the tape is too cold, it can decrease the adhesive wetting capacity.

Duct tape can be used to make a number of simple repairs. For example, if you tear a pane of window glass, crisscrossing the edges with duct tape will help keep insects out until it can be replaced. Another great use for duct tape is to patch holes in your tent. It can even be used to cover a hole in your car to prevent rain from getting in.

Brad nails

Brad nails are a great way to add some flair to a woodworking project. These tiny 18-gauge nails are often used for fine detail trim work and small pieces of molding. They are also ideal for wall paneling, cabinetry, and furniture making. They are lightweight and don’t have as much holding power as larger finishing nails, but their slender design helps prevent splitting delicate materials. They are less prone to rust than galvanized nails, but they should not be used in exterior applications.

A brad nailer is a pneumatic or electric-powered tool that shoots 18-gauge brad nails. These are the smallest nails that you can use for woodworking. These nails are very thin and have a flat head, which makes them easy to hide in wood trim and paneling. They are also available in a variety of lengths, from 5/8-inch to 2-inch.

While you can use a brad nailer for any type of woodworking, they are particularly handy when working with soft, fragile materials. The small size of the nails and their slender shape help prevent splitting and can eliminate the need for glue. They can also be used for fastening case corners and drawer fronts to cabinets or picture frames.

If you want your brad nails to drive in smoothly, rub a little beeswax on the shanks before driving them. This will keep the nails from snagging and make them easier to remove later. Also, try to avoid bending the nails while trying to drive them in.

Voltage tester pen

A handyman needs a variety of tools to complete various tasks. Besides basic tools like drills and screwdrivers, they also need a few specialty tools, such as the voltage tester pen. These devices are small and portable, and they help users quickly test for live electric current. They can be used to check outlets, light fixtures, and even batteries and extension cords. They can also detect GFCI protection.

These tools are similar to multimeters but much more compact. They have two contact points that the user can touch to the circuits’ wires to measure current flow. They can be used for residential and commercial applications, and are very easy to use. A full-size multimeter is usually overkill for homeowners, but these small handheld units can be useful for electricians and other professionals.

A volt stick (also known as a volt detector or voltage indicator) is a great tool for handymen because it allows them to safely check for live electrical currents without having to open the equipment that they are working on. These tools can quickly detect voltage at the tip of their pen and can display a bright red flashing light or a buzzer alarm when they encounter electricity. They can be set to different detection modes, allowing them to work in several situations without having to switch tools. They are also efficient in battery consumption and can reliably check low or standard voltage connections.

Glow rod

Glow rods are a tool that helps you install electrical wires in open spaces such as attics, crawl areas, and walls. They are similar to fish tape and come in a variety of lengths. Most of them are made of fiberglass and have a protective coating to guard your hands from painful splinters. They also have a bright orange color that glows in the dark, illuminating dark joist and stud bays. This makes them easy to maneuver in tight spaces.

A handyman should have a variety of tools for his job. These include a voltage tester pen and a mud ring. These tools are used to protect the drywall while you fish a wire through. They are also useful for insulating and protecting the drywall from water damage. A mud ring also works as a slug stop, preventing the screw that holds the slug from being stripped out of the wall.

The most important thing for a handyman is his skills. He should be able to diagnose problems and make repairs quickly. He should have an excellent knowledge of electrical wiring, plumbing, and construction. He should also be able to read blueprints and understand engineering diagrams.

A Ferret inspection camera can be attached to any fish rod, glow stick, or rigid wire pulling stick and provides a live video feed directly to your smartphone. This makes it easier to navigate dark work spaces and saves time on the job.