blow in insulation

How To Perform Blown-In Insulation And Dust Removal

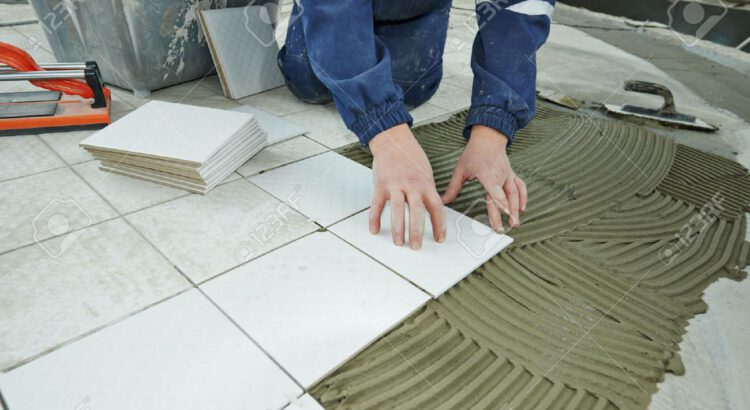
When pests make their way into attics and crawl spaces, they can leave behind unhealthy odors and contaminants. The best way to avoid these risks is by removing the old insulation, cleaning and sanitizing the space, and installing modern blown-in insulation.

Start by setting up the insulation vacuum or blower, ensuring that it is properly secured and positioned according to the manufacturer’s instructions. Position disposal bags nearby, as well. Click here at https://perthinsulationremover.com.au/ for more details.

blow in insulationProtective Gear

Before beginning the insulation removal process it is important to wear proper protective gear, this includes safety goggles or glasses, a dust mask or respirator, long-sleeved work clothes, and sturdy boots. One company coverall is a lightweight, breathable garment that protects from dry particulates and light liquid splash. Its particle filtration efficiency test results in >98%, making it ideal for this type of work. Additionally, it is important to take regular breaks and hydrate, especially when working in a hot or confined space. It is also crucial to bag up used gloves, masks, and coveralls and dispose of them properly. This ensures that the dust and old insulation does not spread throughout your home.

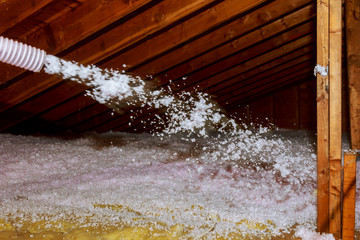
Blown-in insulation is often installed in attics and cavity walls to help increase a home’s energy efficiency. It can also help with noise reduction and can aid in rodent control.

Removing Obstacles & Obstructions

It’s important to remove any obstacles in the attic space that could get in the way or impede your movements during insulation removal. This includes removing any stored items, clutter, or furniture that may be susceptible to dust or debris. You also need to be mindful of any exposed wiring or other electrical hazards that may be present in the attic. This will allow you to maneuver more efficiently and ensure a successful removal process.

Preparing The Workspace

Insulation removal is a messy and sometimes dangerous task. To ensure your safety and the success of the project, it’s important to carefully prepare your workspace before beginning the process. This will help minimize the amount of dust and debris that is created, as well as make it easier to complete the job promptly.

The first step in preparing the workspace is to assess the condition of your attic and insulation. Look for any signs of water damage, mold, pest infestation, and other issues that may compromise the performance or safety of the insulation. It’s also a good idea to check the condition of any electrical wires or plumbing pipes that may be in the attic space.

Once you have a clear understanding of the state of your insulation and attic space, remove any obstacles that might interfere with the removal process. This can be done by opening a window and directing any airflow out of the attic, as well as closing off any vents or air ducts that might be located in the attic. This will prevent any blown insulation from spreading into other parts of the home and making its way into your air ducts and through the ventilation system.

Next, a broom and dustpan should be positioned in the attic to sweep up any loose insulation and debris that is produced during the removal process. Be sure to pay special attention to corners and crevices to ensure that all insulation particles have been removed. Once this is complete, it’s time to set up an insulation vacuum or blower. Ensure that the equipment is properly positioned and securely connected to an extension cord or power source before beginning the removal process.

Finally, position a supply of heavy-duty plastic bags or containers near the extraction point to collect the blown insulation and keep it contained. Using zip ties or twist ties to tightly seal the bags will help minimize the release of any dust or fibers into the air and surrounding areas.

Once you’ve collected all of the blown insulation, be sure to dispose of it properly according to your local regulations. Also, be sure to properly store any equipment you’ve used during the process, such as an insulation vacuum or blower.

Collecting And Disposing Of The Insulation

Once you have removed the insulation, you will need to properly dispose of it. This is important because it will ensure that any harmful materials in the insulation are not released into the environment and cause damage.

You should take the time to figure out how you are going to dispose of your insulation before you start the process. There are a variety of ways to dispose of your insulation, including recycling and donation. This is a great way to reduce waste and conserve resources. If you are unsure how to dispose of your insulation, you can consult a professional to learn more about the best way to dispose of it.

When you are ready to dispose of your insulation, you will need to collect it into durable bags for safe transport and disposal. Contractor bags are ideal for this purpose, as they are substantial and long-lasting. Additionally, these bags can help to prevent the contents of the insulation from seeping out during transit and disposal. To ensure that your insulation is contained and protected, it is best to double-bag the material.

You will also need to vacuum or sweep up any dust that has been collected throughout the cleaning and collection process. Then, put any remaining dust and debris into one of the contractor bags for safe disposal. This will help to prevent any additional dust from spreading in your home.

Once the insulation is in the contractor bags, you can call your local waste management company and schedule a pickup. This is the most responsible way to dispose of your insulation, as it will ensure that the material does not end up in landfills where it could release harmful chemicals into the environment.

In addition to disposing of the insulation, you should also ensure that your home is free from any other unwanted materials, such as asbestos. This is because these materials may pose a health hazard if they are inhaled or come into contact with your skin. It is always a good idea to hire professionals for these types of projects.

Performing blown-in insulation and dust removal is an essential part of maintaining a property’s energy efficiency and indoor air quality. Whether you are a homeowner looking to improve your home’s insulation or a property manager seeking to enhance the comfort and safety of your building, understanding the process of blown-in insulation and dust removal is crucial. In this article, we will discuss the steps involved in performing blown-in insulation and dust removal and the benefits of these maintenance tasks.

Blown-in insulation is a popular method for adding insulation to existing walls, attics, and other hard-to-reach areas. This type of insulation is made of loose, lightweight materials such as fiberglass, cellulose, or mineral wool. It is an effective way to improve a property’s energy efficiency, reduce heating and cooling costs, and create a more comfortable indoor environment.

The first step in performing blown-in insulation is to assess the areas that need insulation. This could include the attic, walls, or any other areas where insulation is lacking or insufficient. Once the areas have been identified, the next step is to prepare the space for insulation. This may involve removing any existing insulation, sealing any gaps or cracks, and ensuring that the space is clean and free of debris.

The actual process of blown-in insulation involves using a special blowing machine to distribute the insulation material into the designated areas. The insulation is blown in at a high velocity, allowing it to fill in gaps, crevices, and other hard-to-reach spaces. This method ensures that the insulation is evenly distributed and provides maximum coverage.

After the blown-in insulation has been installed, it is important to perform a thorough dust removal process. Dust removal is essential for maintaining good indoor air quality and preventing respiratory issues. The blowing process can stir up dust and other particles, so it is crucial to clean and remove any debris that may have been disturbed during the insulation installation.

The dust removal process may involve using a combination of vacuuming, dusting, and air purifying methods to ensure that the indoor environment is clean and free of contaminants. This is especially important for individuals with allergies, asthma, or other respiratory conditions, as dust and airborne particles can exacerbate these health issues.

Performing blown-in insulation and dust removal offers several benefits for property owners and occupants. Firstly, blown-in insulation helps to improve a property’s energy efficiency, reducing heating and cooling costs and creating a more comfortable indoor environment. Proper insulation also helps to regulate indoor temperatures, reducing the strain on HVAC systems and extending their lifespan.

Additionally, performing dust removal after insulation installation helps to maintain good indoor air quality, reducing the risk of respiratory issues and allergies. Clean, well-insulated spaces also contribute to a healthier and more comfortable living environment for occupants, making it a worthwhile investment for property owners and managers.

In conclusion, performing blown-in insulation and dust removal is an essential part of property maintenance. By understanding the process of blown-in insulation and the importance of dust removal, property owners and managers can ensure that their properties are energy-efficient, comfortable, and safe for occupants. Whether you are looking to improve your home’s insulation or enhance the indoor air quality of a commercial building, performing blown-in insulation and dust removal is a valuable investment in the long-term health and efficiency of the property.

Tips for a Successful Tile Renovation

Bathroom Remodeling Milwaukee can transform any room into a beautiful and relaxing space. It comes in various materials, so homeowners can choose the look and feel they want.

Many tile materials come in a variety of shapes. For example, some tiles can be cut on a diagonal, creating a more modern or unique look.

One of the most important aspects of a tile renovation project is thoroughly cleaning all surfaces, particularly floors and grout. If not done properly, residues left behind from construction dust and grout haze can dull or damage the tiles. Cleaning tiles after renovation also helps ensure a long lifespan and prolongs the beauty of the new surface.

Using a vacuum cleaner with a brush attachment is advisable to clean the floor before it is mopped. Vacuuming the floor can help remove loose dirt, debris, and residual adhesives or cement. Then, a mop can be used with hot water and a mild cleanser to clean the tiles and grout. Always follow the manufacturer’s recommendations for cleaning products to avoid damaging or staining the tiles and grout.

After the floors have been cleaned, a final cleanup is needed on the walls. Construction dust, primer stains, and other residues can mar the walls of a room. If these are not properly removed, they can impede proper wall installation and lead to permanent damage.

If there are any primer stains, you can use a solvent like acetone to remove them. However, testing this in an inconspicuous area first is important to ensure it doesn’t damage the tile.

Tile is a versatile and durable material used on walls, floors, or ceilings. It comes in many different styles to suit any home decor. Choosing the right style for your bathroom is an important step in a successful tile renovation project. Consider your design preferences and your home’s unique style to help you choose the best tile for the project.

Before removing the old tile, ensuring your subfloor is ready for the new flooring is important. This will ensure the new floor has a solid foundation that can support the weight of your tiles. If you skip this step, you may damage the subfloor or experience problems with the new tile installation.

It’s also important to prepare the subfloor for tile by looking for and addressing any problems like low spots, water damage, or rot. This can help you avoid future issues with the new floor installation and save money on costly repairs.

You’ll also want to clear the space of any free-standing objects and remove any baseboard trim. Wearing a dust mask during this process is a good idea, as broken tile shards can be dangerous. Consider sealing off your vents to prevent the air from becoming clogged with debris.

Lastly, you’ll want to sweep and vacuum the area. This will eliminate any small pieces of tile and adhesive that might have fallen off during removal. Using a citrus-based adhesive remover that can also be purchased at most home improvement stores is a good idea.

The best way to remove the tile is by starting at the edge of the room, where you can access the underlayment plywood. Once you have a good grip, hammer the flat end of your pry bar underneath one of the larger tile pieces and break it loose. Then, you can chisel the rest of the tile and any remaining adhesive. Be careful to do this sparingly; you want to avoid chiseling through your underlayment or subfloor.

New tiles can add a fresh look to any room, whether on the floor or wall. But when it comes to renovating a bathroom, there are a lot of decisions that have to be made. It’s important to consider the materials and color options and how they will be installed. The final result should be beautiful and functional.

One of the first steps is deciding how the tile will be cut and where it will be placed. Photographing the space and determining how much tile is needed is also helpful. This will help avoid that sinking feeling when you run out of tile halfway through the project.

If you use a tile cutter, scoring the tiles before cutting them is best. This helps ensure a clean cut and can prevent the edges from becoming chipped or rough. This can be done by aligning the square (a ruler shaped like a right angle) with one edge of the tile and using a pencil to draw the guideline. This method is best for bigger jobs that require a lot of cuts.

Before beginning the actual work of installing the tiles, it’s important to make sure that all of the power is turned off and any electrical outlets are covered. Place outlet extenders in the wall outlet boxes is also a good idea. This will allow you to continue working later without worrying about accidentally touching live wires.

When tiling a floor, ordering 10% more tiles than you will need is generally recommended. This will allow you to have extra for broken tiles or miscuts or cut for awkward angles. Having a little extra can also be beneficial if your space needs to be bigger for the full-size tile you want to use.

A tile renovation project is a significant home improvement that requires the right materials. The correct adhesive helps the tiles stay securely bonded to the walls or floor. Choosing the wrong type of tile adhesive can lead to loose tiles that require replacement or damage that needs repair.

Before you begin applying tile adhesive, you must prepare the surface. Ensure that it is free of dust, debris, and loose paint. Clean the wall and remove any fixtures that may get in the way of your tiling project. If needed, sand or scrape the wall to create a flat surface.

There are two prominent types of tile adhesive: pre-mixed and thinset mortars. The one you choose will depend on whether the area will be subject to moisture, movement, or heat.

If you’re using a pre-mixed adhesive, it’s recommended that you use a primer before you apply the tile. This prevents the surface from absorbing the water in the tile adhesive, which can reduce its bonding strength and longevity.

Once you’ve mixed the tile adhesive, it should be spread with a trowel. It’s important to spread evenly across the entire surface before laying tiles. Comb the adhesive with the trowel’s notched edge to do this. This makes ridges that allow for more grip between the tiles and the wall.

It’s also a good idea to work quickly when spreading the adhesive. It sets quickly, so work in small sections to avoid wasting the mixture. Once you’ve applied the adhesive, please wait for it to dry before laying your tiles. To speed up the drying process, you can use a fan or a hairdryer to blow air over the area.

Before you can start laying the tiles, you need to prepare your supplies. Make sure you have plenty of tiles (in the style that best suits your design preferences) and thin-set adhesive. Thin-set is a mortar-based glue typically made from cement, fine sand, and water-retaining additives such as cellulose. Home centers and specialty tile shops usually stock most standard styles, but you may need to place special orders for more exotic tile designs. Estimate the amount of tiles you need based on the square footage of the wall surface, then pad that figure by at least 10 percent to allow for waste and breakage.

When installing the tiles, take the time to carefully check your work to ensure there are no loose or uneven spots. If necessary, strip the previous tile to remove any areas of concern. It would be best to consider re-stripping the walls to clean off any residual moisture and mildew that may have developed.

Plastic spacers keep the joints uniformly spaced as you lay your new tile. The spacers should be placed between each row of tiles and offset by one-half the tile width to maintain a running bond pattern.

Some tiles have directional arrows on their back. When laying these tiles, always keep the directional arrows facing in the same direction to help you maintain consistent pattern alignment.

When you’re finished laying the tiles, leave an expansion gap as the tile manufacturer recommends. This will help prevent cracking once the grout is applied.

bathroom trailer

Why Rent a Bathroom Trailer?

If you’ve ever been to a wedding or other event without bathrooms, you know what a pain it can be. Instead of using gross porta-potties, you can use a restroom trailer that’s equipped with real toilets and everything else that people would expect in a bathroom.

ADA Restroom Trailers offers various benefits that can improve your event or construction project for everyone involved.

bathroom trailer

Unlike standard portable toilets, bathroom trailers are comfortable enough for people to spend a long time in. They provide flushable toilets, running water for handwashing, stylish interiors, climate control systems, and more. They can be used as permanent restrooms on commercial construction projects or at outdoor weddings.

Most people would agree that a portable toilet is pretty uncomfortable, especially when it’s used for extended periods of time. However, bathroom trailers are much more spacious and have multiple amenities that make them a great option for guests who need to use the restroom while at an event.

For example, most of these trailers feature clear and bright lights to make them easy to navigate even in the dark. They also have laminated floors and sinks, which are far more comfortable than the plastic surfaces you find in standard portable toilets. They’re also equipped with mirrors, so guests can check their appearance before they go back outside. Additionally, most trailers have a roll of paper towels for washing hands.

In addition to being more comfortable than portable toilets, bathroom trailers are also easier to maintain and clean than traditional restrooms. Because they’re so spacious and have many extra features, it takes less time to clean and sanitize them, which is important for maintaining a sanitary environment. Additionally, they’re often larger and have more waste storage tanks, so they can hold more waste than a traditional portable toilet can.

Another way that restroom trailers are more comfortable is that they’re usually climate-controlled, so guests don’t have to deal with the unpleasant heat or cold that can make some portable toilets feel like big plastic ovens as soon as you step inside. This is particularly important for construction workers who need to use the restroom throughout the day, and they can help ensure that people aren’t tempted to leave the site early because of discomfort. 

Compared to traditional portable toilets, bathroom trailers are much more versatile. They can be moved around your event site to provide guests with convenient access to bathrooms at their leisure, enhancing the overall guest experience. These mobile restrooms are also more spacious than their porta-potty counterparts, making them an ideal choice for events with children. The larger interior space can accommodate parents and their small children more comfortably, so they’re able to stay together while using the restroom.

In addition, restroom trailers can be outfitted with various amenities that can further enhance the guest experience. This includes ambient lighting, contemporary fixtures, artificial hardwood floors, stainless steel sinks, climate control systems and more. These features can help you tailor your bathroom trailer to an upscale event or work environment and ensure that guests feel comfortable and at home during their visit.

Aside from their luxurious features, restroom trailers are a more sustainable option than portable toilets. While traditional portable toilets require a significant amount of water with every flush, restroom trailers are designed to use significantly less, conserving both water and energy. They also store waste in a sealed tank, which is then collected and hauled away by the rental company after your event has concluded. This keeps harmful waste from seeping into the ground and contaminating surrounding water sources.

If you’re planning an outdoor wedding, a restroom trailer is a great way to set your big day apart from the rest. In fact, these deluxe restrooms are perfect for any occasion that takes place outside, including corporate events and fundraisers.

As long as you have a suitable flat area where your restroom trailer can be placed, it’s easy to rent one and transform your venue. These mobile restrooms are equipped with all the necessities, so you don’t need to worry about providing guests with basic amenities like toilet paper or sanitary products.

Plus, these luxury restrooms come with an attendant. Each one arrives accompanied by an immaculately dressed attendant who will keep the unit stocked and clean for the duration of your rental period. This service can make all the difference in creating a memorable, high-end event.

If you are looking for a greener option when it comes to restrooms, a bathroom trailer is the way to go. These units minimize water usage, use eco-conscious materials and utilize innovative flushing systems to provide a hygienic, environmentally responsible alternative to standard portable toilets.

Another great thing about portable restroom trailers is that they can be moved from one location to the next without any plumbing or connections required. Whether you need a single unit for a small event or several of them to serve your large construction worksite, they are easily portable and designed to accommodate any space.

Unlike a stand-alone porta potty, bathroom trailers have multiple stalls and plenty of room to move around, making them a comfortable and sanitary option for guests. Plus, many trailers are equipped with mirrors and fully functioning sinks so that people can wash their hands and clean up when they visit the restroom.

These units are also able to be customized with ambient lighting, contemporary fixtures, artificial hardwood floors, and other amenities that allow them to fit into any setting. This allows you to create a look that matches your theme and ensures that the restrooms are a seamless addition to your event.

Finally, a restroom trailer can be connected to a portable waste tank for easy disposal of all of the waste generated by your guests. This reduces the amount of garbage you need to dispose of after an event and helps to make sure that your venue stays as sanitary as possible throughout the duration of your event.

Restroom trailers are also a much more sustainable option than other types of portable restrooms because they are self-contained and require no outside water or power supply to operate. This makes them a perfect choice for remote locations where access to plumbing and other utilities may be difficult. Plus, they can be parked in a variety of locations, including on a paved driveway, or even right next to your marquee at a wedding!

If you’re looking for a more affordable option than a traditional portable restroom, consider renting a bathroom trailer. They offer more comfort and functionality than standard portable toilets, and can save you money in the long run by reducing your utility costs. Plus, they’re easier to clean and maintain than other types of portable restrooms.

When you rent a portable restroom trailer, you’ll be able to control the cost of your rental by selecting the size and amenities that are right for your event. For example, a single portable restroom can be rented for one to two day weekends and will only require a water supply and electricity hookup. This option works well for events like weddings or concerts where lines can get long and you need to keep people moving. If you’re planning a larger event that requires more than three portable restrooms, you may need to add a sink and air conditioning to make your guests more comfortable.

Luxury restroom trailers can also be rented for longer periods of time, such as construction projects and disaster relief efforts. They’re equipped with flushable toilets, sinks, and mirrors to help your guests feel pampered. They’re also a great way to provide a sense of home-like comfort for your guests at outdoor events like music concerts or charity fundraisers.

Most restroom trailers are more spacious than a typical portable toilet and have multiple stalls to ensure privacy. They also feature amenities that aren’t always available in portable bathrooms, such as showers and climate control features. This makes them a more convenient option for guests with disabilities, and they can be customized to match your event’s theme or branding.

Unlike standard portable restrooms, many bathroom rental trailers have mirrors so guests can check their appearance before heading back outside. Some even have sinks to wash their hands before leaving, making them more comfortable than the cramped and dark environment of a standard portable restroom.

Once your rental period is up, the restroom company will come and pick it up. They will then empty the waste storage tank and sewage system and transport it to a wastewater treatment plant, where they’ll process the water into clean water. This helps to reduce your event’s carbon footprint by avoiding landfill disposal and minimizing the need for additional portable toilets on-site.