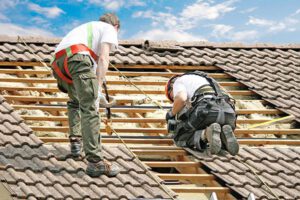
A roof protects a home from the elements. It must be appropriately constructed and maintained. A faulty or old roof can cause leaks, damage to insulation, and structural problems.
A popular roof type is asphalt shingles. Homeowners should regularly clear debris from the roof, such as leaves and branches. A ridge vent and vented soffits can help improve attic airflow, preventing moisture buildup. Visit Website to learn more.
Trees add beauty and value to your property, but they can also damage your roof if their limbs become too close. Careful trimming can help prevent this from happening, but it is important to hire a professional for this task. Making one wrong cut could cause a branch to fall, and that can lead to expensive roof repairs.
In addition to preventing branches from reaching your roof, regular pruning can keep trees healthy and strong. This process involves removing diseased or dead branches, as well as thinning out the foliage to reduce the risk of wind damage. It is recommended that you prune your trees in the spring or summer, when the buds are starting to form.
When trimming your tree, start by looking for signs of fungus or rot. These are a good indicator that the branch should be removed. You should also look for any branch that has a gouge in the bark or is sagging.
Once you find the limb that needs to be removed, cut it back to its point of origin. Make sure that you are not cutting into any bark that is still living. This can lead to the introduction of fungus or disease to the rest of the tree. It is important that you always keep the branch collar intact when cutting a branch off a tree. This area is a slight swelling covered in rough bark, and it can be found at the base of the trunk. Cutting too close to this can lead to rot in the area where you cut the branch.
When thinning out a tree, try to remove no more than one-fourth of the total living crown. This will not only improve the appearance of your home, but it will also help to reduce wind damage. When removing a limb, it is important to make the first cut on the underside of the branch. This will allow the branch to heal correctly by forming a callus. It is also recommended that you avoid removing any branch that has a large amount of foliage.
Inspect the Flashing
Flashing is the key component to directing water away from the most vulnerable areas of the roof, such as valleys, and the junctions where the roof meets vertical surfaces like walls or dormers. It also helps to prevent water from seeping in around protruding vents and pipes, such as a chimney, skylight or a vent pipe. When properly installed, flashing provides a waterproof barrier that keeps moisture from damaging the roof structure and leaking into the house.
Flashing can be made from a number of different materials including copper, aluminum or galvanized steel. It is typically a thin metal strip that is rolled out and sealed to the roof surface. During a home inspection, look for areas of the flashing that are loose, cracked, rusty or missing. If you see a loose flashing section it is important to repair it quickly to prevent water intrusion and subsequent damage.
A common area where flashing can become problematic is around chimneys, skylights and vents. If the flashing is not properly sealed, water can leak into these areas causing mold, ruined drywall and rotten wood. This can also lead to structural problems for the roof and the home. When inspecting the flashing, look for raised nail or screw heads and rust spots. If the flashing is made from aluminum, it will rust and may need to be replaced.
Also, make sure the caulk surrounding the flashing is intact and not cracked or peeling. The caulk acts as an additional seal against moisture and should be replaced when it begins to crack or break down.
If you notice water leaking into the home during heavy rain or after powerful storms, it is important to inspect the flashing and the entire roof for issues. If you find a problem, it is recommended to contact a roofing professional for repairs as soon as possible. A well-maintained roof will protect the home from severe water damage and increase its overall value. It is always a wise investment to invest in your home’s safety and durability.
Inspect the Caulk
A roof inspection should include examining the caulking to ensure it is still able to prevent water from entering the home. This is a very common cause of leaks in homes and can easily be corrected with a fresh coat of caulking. This is especially important around areas of the home that move and stretch, such as corner boards or window edges where moisture can enter. It is also a good idea to re-caulk any areas that have been exposed since the last inspection, such as areas where pipe clamps or vent pipes were installed. This will help to keep moisture and bugs from infiltrating the house and may extend the life of the roof.
It is a good idea to inspect the caulking every season, as each type of weather can affect it differently. For example, hot and humid summers can lead to excessive sun damage while cold wintery conditions can result in freeze-thaw problems. An experienced inspector can spot these types of issues, and the correct repairs can be made to minimize the damage and leaks that can occur.
In addition to looking for deteriorating caulking, an inspector should look for any areas where the caulk has cracked or loosened, as this can also allow water into the home and cause damage. In addition, an inspector should look for moss growing on the caulking as this can indicate moisture issues beneath the shingles.
While a homeowner can perform a basic inspection of the roof on their own, it is always better to have an experienced professional complete a thorough examination and make any necessary repairs. An experienced inspector can spot small problems that may be overlooked by a homeowner, and these minor problems can save thousands of dollars in potential roof repair costs down the road.
If you are squeamish about climbing onto the roof, an experienced inspector can examine your roof from the ground using binoculars and will note any areas that need to be trimmed or repaired. They can also look for signs of rot, as well as check the flashing and caulking on chimneys, vent pipes and other penetrations on the roof to ensure they are secure.
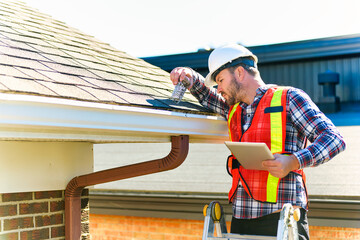
Inspect the Roof
Your roof is a vital part of your home, protecting your family from harsh weather conditions and keeping moisture out. Regular inspections can ensure it is functioning properly and helping to protect your home.
A professional roof inspector will walk on the roof to examine it for damage, stains, and other issues. They will also look for rust or cracks in the thin metal flashing that lines penetrations like skylights, chimneys, and vent pipes. Inspecting these areas is critical as a leaky roof can cause major damage to your home. Inspectors will also check fascia, the horizontal boards that run along a roof’s edges, and soffit boards, which cover the underside of roof overhangs, for rot or other damage. They will also check the condition of masonry chimneys and ridge caps to make sure they are secure.
A roof inspection should also include a visual examination of the shingles. Loose or curling shingles are a sign that it’s time to replace them. Inspectors will also look for stains and other signs of disrepair, such as moss or rust. They’ll also inspect the rubber boots and seals around vent pipes for gaps or deterioration.
Roofs are more complicated than they look, and only a professional knows what to look for. Even high-quality roofing materials can fail if they aren’t installed properly. So, when hiring a roofing company to perform an inspection, find one that has experience and is licensed. They should also be able to provide you with an estimate of costs for their services and explain any potential repairs that may be needed.
A well-maintained roof can add up to a significant amount of money saved in energy costs. A high-quality roof can also help to increase the value of your home. It’s important to schedule regular roof inspections to keep your investment in good condition. If you have a new roof, you should also schedule regular inspections to ensure it is performing as intended. A professional roof inspection can catch any small problems before they become big ones, saving you a lot of trouble in the long run.