Tips for a Successful Tile Renovation

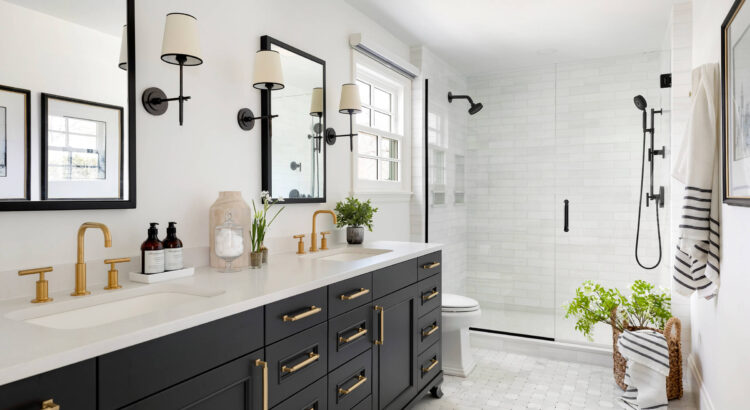
Bathroom Remodeling Milwaukee can transform any room into a beautiful and relaxing space. It comes in various materials, so homeowners can choose the look and feel they want.

Many tile materials come in a variety of shapes. For example, some tiles can be cut on a diagonal, creating a more modern or unique look.

One of the most important aspects of a tile renovation project is thoroughly cleaning all surfaces, particularly floors and grout. If not done properly, residues left behind from construction dust and grout haze can dull or damage the tiles. Cleaning tiles after renovation also helps ensure a long lifespan and prolongs the beauty of the new surface.

Using a vacuum cleaner with a brush attachment is advisable to clean the floor before it is mopped. Vacuuming the floor can help remove loose dirt, debris, and residual adhesives or cement. Then, a mop can be used with hot water and a mild cleanser to clean the tiles and grout. Always follow the manufacturer’s recommendations for cleaning products to avoid damaging or staining the tiles and grout.

After the floors have been cleaned, a final cleanup is needed on the walls. Construction dust, primer stains, and other residues can mar the walls of a room. If these are not properly removed, they can impede proper wall installation and lead to permanent damage.

If there are any primer stains, you can use a solvent like acetone to remove them. However, testing this in an inconspicuous area first is important to ensure it doesn’t damage the tile.

Tile is a versatile and durable material used on walls, floors, or ceilings. It comes in many different styles to suit any home decor. Choosing the right style for your bathroom is an important step in a successful tile renovation project. Consider your design preferences and your home’s unique style to help you choose the best tile for the project.

Before removing the old tile, ensuring your subfloor is ready for the new flooring is important. This will ensure the new floor has a solid foundation that can support the weight of your tiles. If you skip this step, you may damage the subfloor or experience problems with the new tile installation.

It’s also important to prepare the subfloor for tile by looking for and addressing any problems like low spots, water damage, or rot. This can help you avoid future issues with the new floor installation and save money on costly repairs.

You’ll also want to clear the space of any free-standing objects and remove any baseboard trim. Wearing a dust mask during this process is a good idea, as broken tile shards can be dangerous. Consider sealing off your vents to prevent the air from becoming clogged with debris.

Lastly, you’ll want to sweep and vacuum the area. This will eliminate any small pieces of tile and adhesive that might have fallen off during removal. Using a citrus-based adhesive remover that can also be purchased at most home improvement stores is a good idea.

The best way to remove the tile is by starting at the edge of the room, where you can access the underlayment plywood. Once you have a good grip, hammer the flat end of your pry bar underneath one of the larger tile pieces and break it loose. Then, you can chisel the rest of the tile and any remaining adhesive. Be careful to do this sparingly; you want to avoid chiseling through your underlayment or subfloor.

New tiles can add a fresh look to any room, whether on the floor or wall. But when it comes to renovating a bathroom, there are a lot of decisions that have to be made. It’s important to consider the materials and color options and how they will be installed. The final result should be beautiful and functional.

One of the first steps is deciding how the tile will be cut and where it will be placed. Photographing the space and determining how much tile is needed is also helpful. This will help avoid that sinking feeling when you run out of tile halfway through the project.

If you use a tile cutter, scoring the tiles before cutting them is best. This helps ensure a clean cut and can prevent the edges from becoming chipped or rough. This can be done by aligning the square (a ruler shaped like a right angle) with one edge of the tile and using a pencil to draw the guideline. This method is best for bigger jobs that require a lot of cuts.

Before beginning the actual work of installing the tiles, it’s important to make sure that all of the power is turned off and any electrical outlets are covered. Place outlet extenders in the wall outlet boxes is also a good idea. This will allow you to continue working later without worrying about accidentally touching live wires.

When tiling a floor, ordering 10% more tiles than you will need is generally recommended. This will allow you to have extra for broken tiles or miscuts or cut for awkward angles. Having a little extra can also be beneficial if your space needs to be bigger for the full-size tile you want to use.

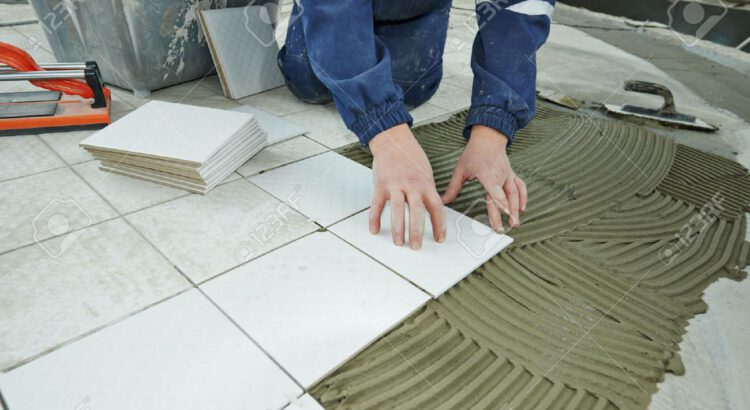
A tile renovation project is a significant home improvement that requires the right materials. The correct adhesive helps the tiles stay securely bonded to the walls or floor. Choosing the wrong type of tile adhesive can lead to loose tiles that require replacement or damage that needs repair.

Before you begin applying tile adhesive, you must prepare the surface. Ensure that it is free of dust, debris, and loose paint. Clean the wall and remove any fixtures that may get in the way of your tiling project. If needed, sand or scrape the wall to create a flat surface.

There are two prominent types of tile adhesive: pre-mixed and thinset mortars. The one you choose will depend on whether the area will be subject to moisture, movement, or heat.

If you’re using a pre-mixed adhesive, it’s recommended that you use a primer before you apply the tile. This prevents the surface from absorbing the water in the tile adhesive, which can reduce its bonding strength and longevity.

Once you’ve mixed the tile adhesive, it should be spread with a trowel. It’s important to spread evenly across the entire surface before laying tiles. Comb the adhesive with the trowel’s notched edge to do this. This makes ridges that allow for more grip between the tiles and the wall.

It’s also a good idea to work quickly when spreading the adhesive. It sets quickly, so work in small sections to avoid wasting the mixture. Once you’ve applied the adhesive, please wait for it to dry before laying your tiles. To speed up the drying process, you can use a fan or a hairdryer to blow air over the area.

Before you can start laying the tiles, you need to prepare your supplies. Make sure you have plenty of tiles (in the style that best suits your design preferences) and thin-set adhesive. Thin-set is a mortar-based glue typically made from cement, fine sand, and water-retaining additives such as cellulose. Home centers and specialty tile shops usually stock most standard styles, but you may need to place special orders for more exotic tile designs. Estimate the amount of tiles you need based on the square footage of the wall surface, then pad that figure by at least 10 percent to allow for waste and breakage.

When installing the tiles, take the time to carefully check your work to ensure there are no loose or uneven spots. If necessary, strip the previous tile to remove any areas of concern. It would be best to consider re-stripping the walls to clean off any residual moisture and mildew that may have developed.

Plastic spacers keep the joints uniformly spaced as you lay your new tile. The spacers should be placed between each row of tiles and offset by one-half the tile width to maintain a running bond pattern.

Some tiles have directional arrows on their back. When laying these tiles, always keep the directional arrows facing in the same direction to help you maintain consistent pattern alignment.

When you’re finished laying the tiles, leave an expansion gap as the tile manufacturer recommends. This will help prevent cracking once the grout is applied.

Planning a Bathroom Remodel

Bathroom remodeling in Home Remodel Contractors Tacoma adds value to your home, especially if you are considering selling it. Replacing old hardware like tubs and toilets with low-flow fixtures can save water, and adding shelving and cabinets can increase storage capacity.
Remodeling refers to various changes that affect the layout, design, or overall appearance of a room. This is different from renovating, which usually involves structural changes, such as reworking the size of a room.


One of the first things you’ll need to consider when planning a bathroom remodel is the layout. Depending on how often you use your bathroom and what for, you’ll want to plan out where you put everything from the sink, bathtub, and toilet so that they’re easy to access when it comes time to brush your teeth or take a shower.
The curved basins, which have mirror cabinets on their sides, are opposite each other, as well as the shower enclosure and toilet, while a tub sits directly next to the door.
This unique layout is the perfect example of how creative space planning can elevate the design and function of a bathroom. The use of rectangular areas with rounded corners in this modern layout creates an interesting balance while making the room look stylish and neat.
A remodel is a more involved project than a renovation because it involves changing the design, layout, and appearance of the bathroom. This includes cosmetic changes such as painting the walls, adding new flooring, or installing a new vanity and cabinet. It can also involve removing walls, moving plumbing hookups, or changing the location of fixtures. Typically, a remodel requires the help of a professional and will cost more than simply renovating.
Once the basic structure of the room is finished (walls, showers/tubs & cabinets), it is time to move on to the details. Adding lighting can help to set the mood & function of this space. There are several ways to light up your bathroom & the choices are endless.
To create an ambient, even glow in the room, consider using wall sconces or flush mount lights that provide lots of light without overpowering the room. For task lighting, recessed or track lights are an option that can be focused exactly where needed. A dimmer is an easy way to add flexibility and control. Bath bar lights are another great way to add a lot of light with a more contemporary look & feel.
Lighting color temperature is also an important consideration. A warmer tone will reduce shadows & make skin tones appear more flattering, while a cooler shade allows colors to be seen with better clarity and less of a bluish tint.
When choosing a contractor to handle your remodel, be sure they are a licensed professional. Some require contractors to be licensed and insured before they begin work on your home. If you live in a neighborhood with a homeowner/condo association, you may need approval before starting the remodel.
Before remodeling begins, it is a good idea to remove or cover any items in the vicinity of the area that will be worked on. This will prevent damage to furnishings, electronics, or other items that may get covered in dust & dirt during the renovation process. This will allow you to clean windows and vacuum the area before construction starts.
A bathroom is a high-traffic space that can quickly become cluttered. Fortunately, the remodeling process offers plenty of opportunities to add storage solutions that help keep things tidy and organized.
Whether you’re looking for a quick fix or a complete overhaul, these savvy bathroom storage ideas are sure to give your space a boost. The smallest improvements can make a big difference, from adding extra shelves to your cabinetry to installing a built-in shelving unit like what Larson said in this small powder room.
Pretty clear storage bins are essential for keeping everything from toiletries to hair products and accessories organized, especially when adorned with printable labels for easy-to-read labeling. If your bathroom has a lot of open shelving, try introducing some decorative baskets to the mix for additional visual interest and a touch of softness.
Over-the-cabinet baskets can be a game changer for storing things like blow dryers, curling irons, and straighteners that easily get lost in the back of a drawer or a deep cabinet. They’re a great way to keep all your tools in one place while making them easy to grab when it’s time to style.
When not in use, the top two trays can store face wash, cotton balls, and other essentials. You can even spruce up your cart with an easy-to-care-for plant for an instant dose of tranquility.
While you are remodeling your bathroom, you will be installing new fixtures, including sinks, showers and tubs, toilets, cabinets, and mirrors. These fixtures can dramatically impact the overall style of your bathroom. They should match the style of your home and be easy to clean.
It would be best if you always visited a plumbing showroom to get ideas and help make selections. It is also helpful to revisit your priority list of fixture features as you look at different options, especially for items that may be difficult to change after the remodel, like your faucet. For example, do you want separate hot and cold water knobs, or would you prefer one-hand control?
A bathroom is a room where the use of color is very important. You will want your new fixtures to coordinate with the paint and tile you plan to use for your bathroom. If you plan on repainting the bathroom after your renovation, make sure that you are selecting colors that will coordinate with your new fixtures and that you know how much your project will cost to install a paint job.
If you plan on a DIY remodel, it is best to keep in mind the difficulty level of your renovation and have additional tools on hand for unexpected situations. For example, a wet-dry shop vac will be useful for cleaning up water or dust that may fall during the remodeling process. Also, it is always good to mark where the electrical wiring and plumbing pipes are located so you don’t accidentally damage them.
When choosing new bathroom fixtures, it is best to stick with neutral options to resell your house easily. Bathroom-style fads can be short-lived, and a dated bathroom can detract from your resale value.
When remodeling a bathroom, there are many things to take into consideration. Some factors are more important than others and can have a huge impact on how the finished project will look and function. Whether you are tackling a complete overhaul or simply changing at least one aspect of the space, it’s important to plan and make sure that your design choices align with your goals and fit within your budget.
A remodel focuses on changes that affect the layout, design, and appearance of a room without altering its size or structure. This can include anything from shifting the location of a tub or toilet to installing a new vanity cabinet or countertop. It could also involve adding or replacing flooring or refinishing the existing tile.
Renovating your bathroom can give it a completely new look while still maintaining the overall functionality of the space. For example, upgrading your light fixtures to energy-efficient models can help lower your utility bills. Likewise, replacing old toilets with WaterSense-certified models will reduce your home’s water usage.
A renovation can also preserve and enhance the classic features of your bathroom, such as a vintage clawfoot bathtub or beaded-board wainscoting. For instance, painting these classic features a fresh color can revive their original beauty while making them more functional. A renovation is also the perfect time to consider upgrading your vanity, mirror, and sink. Choosing the right materials and finishes will ensure your new bathroom is consistent with your home’s style. This will help to create a seamless transition between rooms. It’s a good idea to create a floor plan before starting any work to determine how your new bathroom will fit in the existing space.